是的,程式安裝完畢時,已預設開啟 SSL 3.0 功能。
30天試用版下載:
http://shopping.ahasoft.com.tw/trial/index.php?act=view&id=222
Enabling SSL on EFT Server:
http://help.globalscape.com/help/eft6/Enabling_SSL_on_the_Server.htm
2009-10-29
2009-10-22
2009-10-20
如何在MDaemon中監控特定信箱的發信內容
1
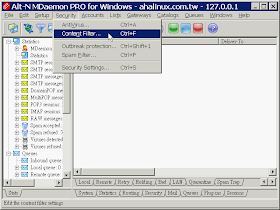
「Security」→「Content Filter...」。
2
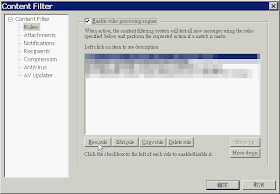
按「New rule」按鈕。
3
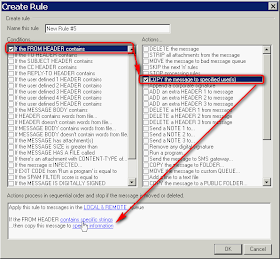
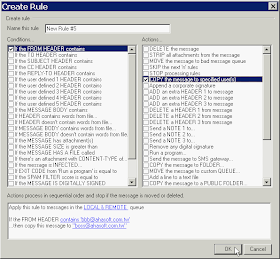
先點選「If the FROM HEADER contains」及「COPY the message to specified user(s)」,再來分別設定寄件者及副本接收者。
4
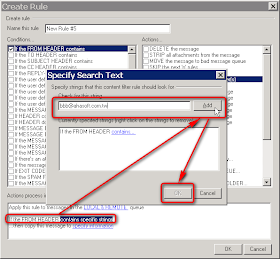
於「Create Rule」視窗按下「If the FROM HEADER contains specific strings」,再於「Specify Search Text」視窗輸入寄件者(bbb@ahasoft.com.tw)後,按「Add」→「OK」。
5
於「Create Rule」視窗按下「...then copy this message to specify information」,再於「Copy Message To...」視窗輸入收件者(boss@ahasoft.com.tw)後,按「Add」→「OK」。
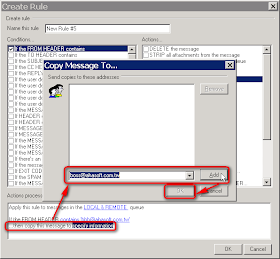
6
設定完成!任何由 bbb@ahasoft.com.tw 所寄出的信件將由 MDaemon 自動轉寄一份給 boss@ahasoft.com.tw。
「Security」→「Content Filter...」。

2
按「New rule」按鈕。

3
先點選「If the FROM HEADER contains」及「COPY the message to specified user(s)」,再來分別設定寄件者及副本接收者。

4
於「Create Rule」視窗按下「If the FROM HEADER contains specific strings」,再於「Specify Search Text」視窗輸入寄件者(bbb@ahasoft.com.tw)後,按「Add」→「OK」。

5
於「Create Rule」視窗按下「...then copy this message to specify information」,再於「Copy Message To...」視窗輸入收件者(boss@ahasoft.com.tw)後,按「Add」→「OK」。

6
設定完成!任何由 bbb@ahasoft.com.tw 所寄出的信件將由 MDaemon 自動轉寄一份給 boss@ahasoft.com.tw。

2009-10-16
MDaemon 設定郵件轉寄後原本信箱收不到信?
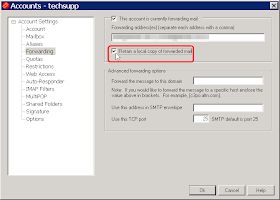
假設您在 A 帳號中設定將信件轉寄一份給 B 時,通常要勾選「Retain a local copy of forwarded mail」,其差別解釋如下:
勾選「Retain a local copy of forwarded mail」- 保留一份給 A。
沒勾選「Retain a local copy of forwarded mail」- 信件會直接轉給 B,A 不會收到。
2009-10-14
InstallShield 安裝時出現錯誤代碼 1152: Error extracting
Products
InstallShield 11.5 Premier, InstallShield 11.5 Professional, InstallShield 11 Premier, InstallShield 11 Professional
Project Type
Basic MSI, InstallScript, InstallScript MSI
Symptoms
Error 1152 is only encountered at run time and is displayed in the following format:
Error extracting to the temporary location.
Cause
When a compressed network image (single compressed setup.exe) is launched, the files compressed within it will be extracted to the TEMP folder and launched from that location. If one or more files cannot be extracted, then error 1152 occurs.
There is not enough disk space on the hard drive in which files are being extracted.
Verify that the TEMP folder is writable.
One or more files have been corrupted. This may have occurred if the installation was downloaded.
Resolution
Free up as much disk space as possible on the drive that holds the TEMP folder. See the Additional Information section for more information on the TEMP folder.
Clean the default TEMP folder and provide users with Write privileges to the TEMP folder. See the Additional Information section for more information on the TEMP folder.
1. Redownload and rerun the installation.
2. If the installation is being run from a network location, try running it locally.
Additional Information
The TEMP folder is the folder used by the system to place temporary files that can be deleted at a later time. Follow the steps below to determine the TEMP folder for your system and the permissions set on the folder.
1. To access the default Temp directory, launch the DOS prompt on the machine, and type 'Set'. Then hit enter. This will display the values of all the environment variables including TEMP.
2. Find the TEMP folder in Windows Explorer, right-click it, and choose properties. Verify that the Read-Only check box is not checked.
3. If you are running the installation on a Win2K or WinNT system that is using a NTFS partition, verify that the user running the setup has permissions to write to this folder.
4. Right-click the TEMP folder, and choose properties. Now select the Security tab. A list of users will be viewable within this tab. The permissions for each user will be viewable underneath. You can add additional users and change permissions if needed. Permissions should not be an issue if running on Win9X systems.
Error 1152 is documented in the InstallShield Help Library topic Troubleshooting Setup.exe Run-Time Errors.
Reference:
Q107317: ERRDOC: Setup.exe Error 1152
InstallShield 11.5 Premier, InstallShield 11.5 Professional, InstallShield 11 Premier, InstallShield 11 Professional
Project Type
Basic MSI, InstallScript, InstallScript MSI
Symptoms
Error 1152 is only encountered at run time and is displayed in the following format:
Error extracting
Cause
When a compressed network image (single compressed setup.exe) is launched, the files compressed within it will be extracted to the TEMP folder and launched from that location. If one or more files cannot be extracted, then error 1152 occurs.
There is not enough disk space on the hard drive in which files are being extracted.
Verify that the TEMP folder is writable.
One or more files have been corrupted. This may have occurred if the installation was downloaded.
Resolution
Free up as much disk space as possible on the drive that holds the TEMP folder. See the Additional Information section for more information on the TEMP folder.
Clean the default TEMP folder and provide users with Write privileges to the TEMP folder. See the Additional Information section for more information on the TEMP folder.
1. Redownload and rerun the installation.
2. If the installation is being run from a network location, try running it locally.
Additional Information
The TEMP folder is the folder used by the system to place temporary files that can be deleted at a later time. Follow the steps below to determine the TEMP folder for your system and the permissions set on the folder.
1. To access the default Temp directory, launch the DOS prompt on the machine, and type 'Set'. Then hit enter. This will display the values of all the environment variables including TEMP.
2. Find the TEMP folder in Windows Explorer, right-click it, and choose properties. Verify that the Read-Only check box is not checked.
3. If you are running the installation on a Win2K or WinNT system that is using a NTFS partition, verify that the user running the setup has permissions to write to this folder.
4. Right-click the TEMP folder, and choose properties. Now select the Security tab. A list of users will be viewable within this tab. The permissions for each user will be viewable underneath. You can add additional users and change permissions if needed. Permissions should not be an issue if running on Win9X systems.
Error 1152 is documented in the InstallShield Help Library topic Troubleshooting Setup.exe Run-Time Errors.
Reference:
Q107317: ERRDOC: Setup.exe Error 1152
2009-10-08
XoftSpySE 註冊
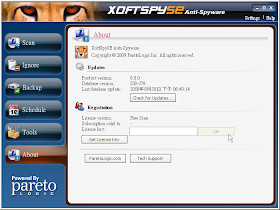
請於「About」中的「License key」文字框輸入您所購買的序號。
無法註冊的原因可能是:
1. 一個序號只能註冊一次,而您超過註冊此限制。
2. 原廠授權伺服器忙線中,請稍後再試。
3. 英文版跟中文版的序號不同。
[密技] 設定 MDaemon 網域簽名檔
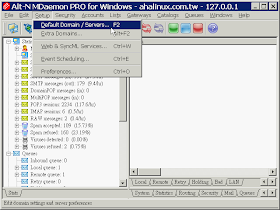
MDaemon 可以設定網域簽名檔(Domain Signatures),讓所有從 MDaemon 寄出的信都自動夾帶簽名檔:
1
【Setup】→【Default Domain / Servers...】。
2
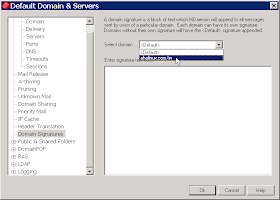
點選視窗左方「Domain Signatures」選項後,「Select domain」使用預設的
3
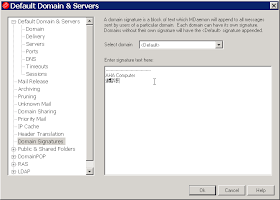
網域簽名檔支援中英文,可以運用於公司資安政策宣導、公司聯絡資料...等等,相當實用!
原廠文件:
How do I attach a corporate signature to all outgoing messages from my server?
1
【Setup】→【Default Domain / Servers...】。

2
點選視窗左方「Domain Signatures」選項後,「Select domain」使用預設的

3
網域簽名檔支援中英文,可以運用於公司資安政策宣導、公司聯絡資料...等等,相當實用!

原廠文件:
How do I attach a corporate signature to all outgoing messages from my server?
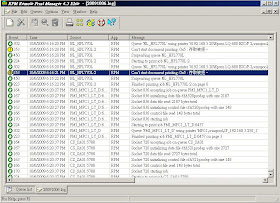
[RPM故障排除] Event 353: Can't start document printing 0xbbb : 存取被拒
問題說明:
Event 353 存取被拒,RPM 主機為網域環境,印表機接在 Workgroup 上,列印時馬上會變成 Suspend,RPM 上有輸入 Workgroup 帳號密碼,請問如何解決?
When attempting to print from RPM to a shared Windows printer, the queue is suspended automatically by RPM and one of the following warning messages are logged:
Event 353: Can't start document printing 0xbbb : A StartDocPrinter() call was not issued
Event 327: Unable to open printer '
解決方案:
此錯誤訊息最常發生於 Windows 95/98/ME 的共享印表機,因為您並沒有讓「RPM Service」以 Domain Administrator 權限登入,才會發生此錯誤,請參考權限設定教學:
RPM Remote Print Manager Installation and Setup Guide for Windows 2000, XP, and Server 2003
These messages are typically found when printing to a printer shared from a Windows 95, 98, or Millennium Edition operating system, but could also be found with other Windows operating systems as well.
By default, RPM is configured to run as the local SYSTEM account. This account has access only to local resources and cannot even see resources such as printers or folders shared from other computers. The RPM service needs to be configured to run as a DOMAIN user account. Almost any domain user account is sufficient.
Instructions for changing the account the RPM service is running as can be found in the installation and setup instructions for RPM Elite and RPM Select.
來源:
Error printing to a shared printer
2009-10-06
[教學] 如何設定 MDaemon 收外部信 (MultiPOP)
MultiPOP 是設定收外部信箱到 MDaemon 帳號的功能,一旦設定了外部信箱,則同樣套用 MDaemon 現用的垃圾信、病毒信、廣告信過濾功能。
* 設定及啟動 MultiPOP 功能
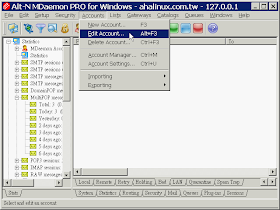
1
【Account】→ 【Edit Account...】。
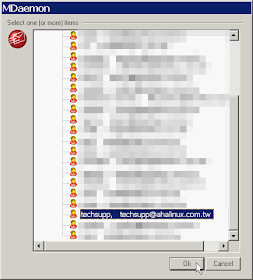
2
點選一個帳號後按〔OK〕。
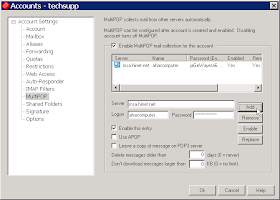
3
在「Accounts」視窗左邊窗格按「MultiPOP」,於視窗右邊輸入外部信箱的「Server 主機」、「Logon 帳號」、「Password 密碼」後按〔Add〕新增外部信箱。
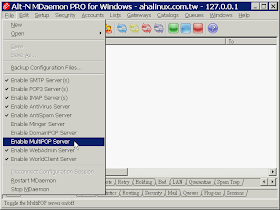
4
按功能選單【File】→【Enable MultiPOP Server】啟動 MultiPOP 功能。
* 觀察 MultiPOP 記錄
收到的外部信數量統計:程式主畫面左邊窗格「Statistics」→「MultiPOP messages(in)」。
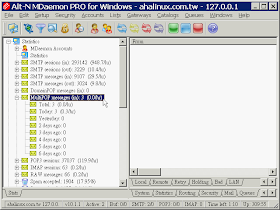
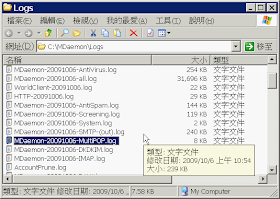
MultiPOP 記錄檔:「C:\MDaemon\Logs\MDaemon-xxxxxxxx-MultiPOP.log」。
* 調整外部信檢查頻率
1
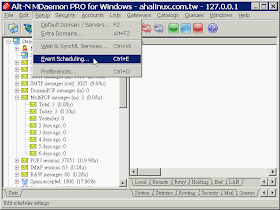
【Setup】→【Event Scheduling...】。
2
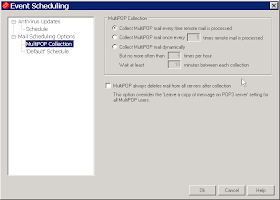
在「Event Scheduling」視窗中的「MultiPOP Collection」中有多個檢查頻率的選項。
原廠英文技術文件:
MDaemon : Configuring MultiPOP in MDaemon
* 設定及啟動 MultiPOP 功能
1
【Account】→ 【Edit Account...】。

2
點選一個帳號後按〔OK〕。

3
在「Accounts」視窗左邊窗格按「MultiPOP」,於視窗右邊輸入外部信箱的「Server 主機」、「Logon 帳號」、「Password 密碼」後按〔Add〕新增外部信箱。

4
按功能選單【File】→【Enable MultiPOP Server】啟動 MultiPOP 功能。

* 觀察 MultiPOP 記錄
收到的外部信數量統計:程式主畫面左邊窗格「Statistics」→「MultiPOP messages(in)」。

MultiPOP 記錄檔:「C:\MDaemon\Logs\MDaemon-xxxxxxxx-MultiPOP.log」。

* 調整外部信檢查頻率
1
【Setup】→【Event Scheduling...】。

2
在「Event Scheduling」視窗中的「MultiPOP Collection」中有多個檢查頻率的選項。

原廠英文技術文件:
MDaemon : Configuring MultiPOP in MDaemon
2009-10-05
試用 RPM 時 Job 一直停在 Queue 裡列印不出來
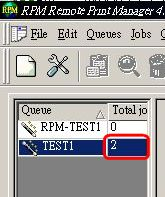
解決方式:
到「Edit Queues」視窗中的「Queue Types」下,將預設的「Print text, allows font selection, page setup」改為「Pass data directly to the printer (raw)」。

2009-10-02
於 Windows 2000 安裝新版 UltraEdit 出現無法找到動態連結程式庫 gdiplus.dll 錯誤
於 Windows 2000 安裝新版 UltraEdit 出現下列錯誤畫面:

這是因為您的 Windows 2000 機器上沒有新版 UltraEdit framework,請先下載安裝 GDI+ 後再開啟 UltraEdit:
http://www.microsoft.com/downloads/details.aspx?FamilyId=6A63AB9C-DF12-4D41-933C-BE590FEAA05A&displaylang=en
下載解壓縮後會有兩個資料夾,請複製「asms\10\msft\windows\gdiplus」資料夾下的 3 個檔案到「C:\Program Files\IDM Computer Solutions\UltraEdit」。
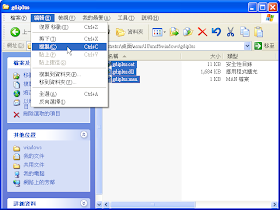

這是因為您的 Windows 2000 機器上沒有新版 UltraEdit framework,請先下載安裝 GDI+ 後再開啟 UltraEdit:
http://www.microsoft.com/downloads/details.aspx?FamilyId=6A63AB9C-DF12-4D41-933C-BE590FEAA05A&displaylang=en
下載解壓縮後會有兩個資料夾,請複製「asms\10\msft\windows\gdiplus」資料夾下的 3 個檔案到「C:\Program Files\IDM Computer Solutions\UltraEdit」。

Camtasia Studio 問題診斷
有關 Camtasia Studio 的問題診斷,必須請您匯出兩項系統資訊(*.txt)供官方診斷:
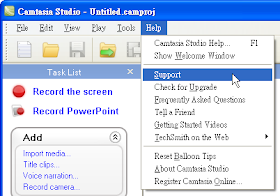
1
【Help】→【Support】。
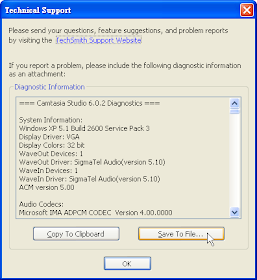
2
按〔Save To File...〕將 Camtasia Studio 訊息儲存成第一個 TXT 文字檔。
3
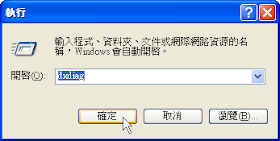
於【開始】→【執行】→輸入「dxdiag」→〔確定〕。
4
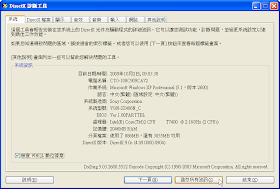
於「DirectX 診斷工具」視窗按〔是〕按鈕。

5
按〔儲存所有資訊〕按鈕儲存檔第二個TXT文字檔,並將這兩個文字檔提供給我們。
1
【Help】→【Support】。

2
按〔Save To File...〕將 Camtasia Studio 訊息儲存成第一個 TXT 文字檔。

3
於【開始】→【執行】→輸入「dxdiag」→〔確定〕。

4
於「DirectX 診斷工具」視窗按〔是〕按鈕。

5
按〔儲存所有資訊〕按鈕儲存檔第二個TXT文字檔,並將這兩個文字檔提供給我們。

2009-10-01
MDaemon 如何擋掉垃圾信發送者以自己名義寄給自己的垃圾信?
假設你的郵件帳號是「abc@abc.com」,如果常常收到來自「abc@abc.com」寄給自己(abc@abc.com)的垃圾信,可以於 MDaemon Mail Server 新增以下設定:
1
【Security】→【Security Settings...】。
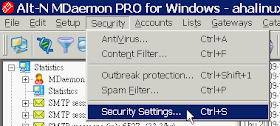
2
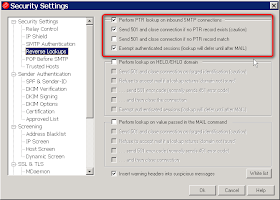
在「Security Settings」視窗左邊窗格點選「Reverse Lookups」,勾選「Perform PTR lookup on inbound SMTP connections」功能,及「Send 501 and close connection if no PTR record exists (caution)」、「Exempt autherticated sessions (lookup will defer until after MAIL)」選項,拒絕沒有PTR記錄的郵件發送來源。
相關文件:
Configuring reverse-DNS lookup options in SecurityGateway
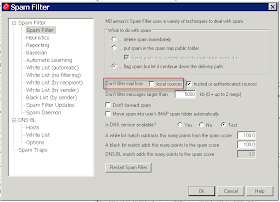
完成以上設定後,還要把「Spam Filter」裡面的 Don't filter mail from「local sources」取消勾選!
1
【Security】→【Security Settings...】。

2
在「Security Settings」視窗左邊窗格點選「Reverse Lookups」,勾選「Perform PTR lookup on inbound SMTP connections」功能,及「Send 501 and close connection if no PTR record exists (caution)」、「Exempt autherticated sessions (lookup will defer until after MAIL)」選項,拒絕沒有PTR記錄的郵件發送來源。

相關文件:
Configuring reverse-DNS lookup options in SecurityGateway
完成以上設定後,還要把「Spam Filter」裡面的 Don't filter mail from「local sources」取消勾選!


